Choose your database:
AnySQL
MySQL
MS SQL Server
PostgreSQL
SQLite
Firebird
Oracle
SQL Anywhere
DB2
MaxDB

Subscribe to our news:
Partners
Testimonials
J Canepa: "There is a lot of software out there for managing PostgreSQL. Yours is simply the best! Great product".
Andrew Maclean: "I am really quite impressed with the software. You and your people are doing a wonderful job. I actually have spent a while researching PostgreSQL admin/code generators and yours seems to fit our needs nicely. Your interface is beautiful".

More

Add your opinion

PostgreSQL Maestro online Help

Prev Return to chapter overview Next

Connection parameters

PostgreSQL Maestro allows you to connect to PostgreSQL directly, or via Secure SHell (SSH) tunnel, or HTTP tunnel.


Direct connection

It is the most natural and the most preferable connection mode. Use it each time it is possible.


SSH tunnel connection

If your PostgreSQL server does not allow direct connections from your remote workstations, you can establish connection to an allowed intermediate SSH server and forward all PostgreSQL commands through the Secure SHell (SSH) tunnel.


HTTP tunnel connection

HTTP tunneling is a technique used in conditions of restricted network connectivity including firewalled networks, networks behind proxy servers, and NATs. It is the slowest way and is recommended to use if the others are impossible.


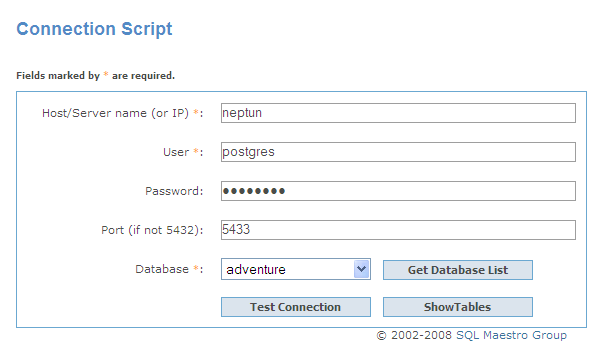
Irrespectively of a connection mode you should specify common credentials as follows:


Host

The host name of the PostgreSQL server.


Port number

The TCP/IP port to use. Default PostgreSQL port is 5432.


SSL Options

It is possible for both the client and server to provide SSL certificates to each other. It takes some extra configuration on each side, but this provides stronger verification of identity than the mere use of passwords. For more information about using SSL encryption, see the PostgreSQL documentation.


 More about SSL options


First, specify the SSL Mode to be used. You can Disable, Allow, Prefer or Require SSL encryption. Select Verify-CA to allow the server to verify that the client's certificate is signed by one of the trusted certificate authorities. If Verify-Full is selected, the server will not only verify the certificate chain, but it will also check whether the username or its mapping matches the cn (Common Name) of the provided certificate.


Client certificate

Use this field to specify the file containing the client SSL certificate. This file will replace the default ~/.postgresql/postgresql.crt if pgAdmin is installed in Desktop mode, and <STORAGE_DIR>/<USERNAME>/.postgresql/postgresql.crt if pgAdmin is installed in Web mode. This parameter is ignored if an SSL connection is not made.


Client certificate key

Specify here the file containing the secret key used for the client certificate. This file will replace the default ~/.postgresql/postgresql.key if pgAdmin is installed in Desktop mode, and <STORAGE_DIR>/<USERNAME>/.postgresql/postgresql.key if pgAdmin is installed in Web mode. This parameter is ignored if an SSL connection is not made.


Root certificate

Specify here the file containing the SSL certificate authority. This file will replace the default ~/.postgresql/root.crt. This parameter is ignored if an SSL connection is not made.


Certificate revocation list

Use this field to specify the file containing the SSL certificate revocation list. This list will replace the default list, found in ~/.postgresql/root.crl. This parameter is ignored if an SSL connection is not made.


SSL compression

If this option is ON, data sent over SSL connections will be compressed. The default value is False (compression is disabled). This parameter is ignored if an SSL connection is not made.


User name

The username used to connect to PostgreSQL.


Password

The password for the user account on server.


 More about SSH tunnel connection


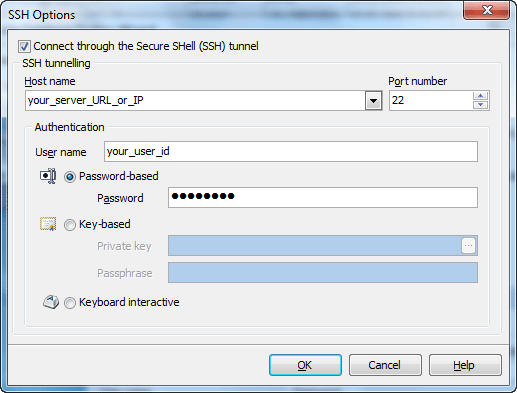
To establish connection to intermediate SSH server and forward all PostgreSQL commands through the secure tunnel, you need to:


1. Check I can connect to the server directly or via SSH tunneling.


2. Follow the Configure SSH options link to open the SSH Options window.


3.Check Connect through the Secure Shell (SSH) tunnel and complete the following fields:


Host name

Specify the host name or IP of your site. Note, that PostgreSQL host name always should be set relatively to the SSH server. For example, if both of PostgreSQL and SSH servers are located on the same computer, you should specify localhost as Host name instead of server's external host name or IP address.


Port number

Enter the port number for the SSH server.
 

4. Enter valid User name for the remote server and select the Authentication method and set corresponding credentials.


Password-based

Set the password corresponding to the specified user.


Key-based

Specify the path to the Private key file with the corresponding Passphrase to log in to the remote server. PostgreSQL Maestro accepts keys in ssh.com or OpenSSH formats. To convert a private key from PuTTY's format to one of the formats supported by our software, use the PuTTYgen utility that can be freely downloaded from the PuTTY website.


Keyboard interactive

Keyboard authentication is the advanced form of password authentication, aimed specifically at the human operator as a client. During keyboard authentication zero or more prompts (questions) is presented to the user. The user should give the answer to each prompt (question). The number and contents of the questions are virtually not limited, so certain types of automated logins are also possible.


 More about connection via HTTP tunnel


To connect to a remote server using an HTTP tunnel, you need to:


1.Upload the connection PHP script to your website. The script is named pgsql_tunnel.php and can be found under the installation folder, usually C:\Program Files\SQL Maestro Group\PostgreSQL Maestro.


2.Select the I have to use HTTP tunneling radio button.


3.Enter the connection PHP script URL, e.g. www.yoursite.com/files/pgsql_tunnel.php. You can test the connection before the profile is created. Just use Test script using default browser to open connection script in your browser, enter all the required connection parameters and click the Test connection button.


4.In case using of a proxy server use Configure tunnelling options to open the HTTP tunnelling options window and specify your proxy server connection parameters and HTTP authentication.
 

Note: You are actually connecting to your database through the PHP script on the server, so in most cases the host/server name is "localhost" unless the target database server is not installed on the same computer as the Web server.


Prev Return to chapter overview Next