
 Download
 Buy
BuyPostgreSQL Maestro online Help
| Prev | Return to chapter overview | Next |
Explaining user interface
The SQL Maestro Group products are famous for their clear and intuitive user interface. The programs are built around the three-pane workspace that includes the database explorer and child windows consisting of the navigation bar and work area.
This topic provides a brief guide to the components of PostgreSQL Maestro's user interface. For detailed descriptions, see below.
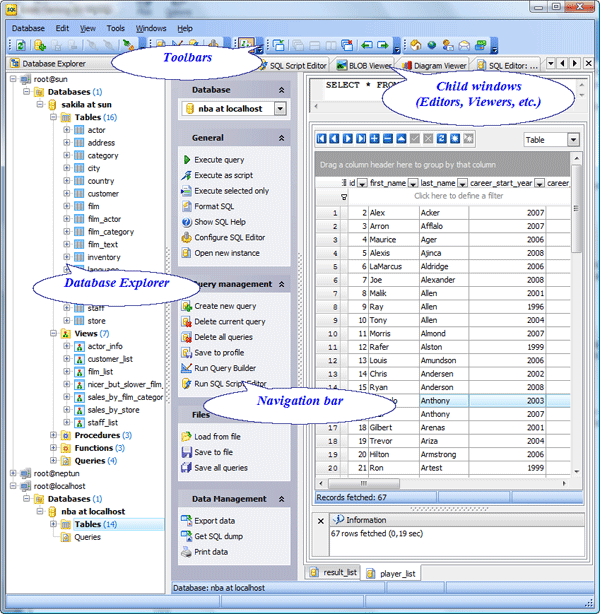
Database Explorer
The Database Explorer occupies the left side of PostgreSQL Maestro main window. It represents all the connected databases objects including system objects.
The explorer provides the fastest way to reach the object properties, to perform the following operations with database profiles using the popup menu:
| • | create new objects (database profiles, database objects, table objects...); |
| • | edit currently selected objects; |
| • | remove currently selected objects from the explorer tree; |
| • | duplicate objects; |
| • | rename objects if available and edit object comments out of the object editor. |
See also: Filtering explorer content
Editors and Viewers
According to the MDI style implementation the PostgreSQL Maestro tools and editors are opened in appropriate windows. Each window consists of a navigation bar and work area. The software supports Classic and Tabbed MDI.
See also: Switching between windows, Tabbed MDI
Navigation bar
The Navigation Bar contains a set of logically grouped links provided to realize the corresponding actions. Just position the mouse over a link and wait for a second to display the appropriate action shortcut making it possible for experienced users to control the program almost entirely with the keyboard.
See also: Shortcut keys
Toolbars
The bars occupy the top of the main window. The Toolbars provide quick access to the most frequently-used functions. Just position the mouse over a tool and wait for a second to display a brief text describing what it is for.
| Prev | Return to chapter overview | Next |