


 Download
 Buy
BuyPHP Generator for MySQL online Help
| Prev | Return to chapter overview | Next |
OnGetCustomFormLayout
This event allows you to customize the layout for View, Edit, and Insert forms (Live Demo). Video Tutorial demonstrates an example of View, Edit and Insert forms adjustment.
Signature:
function OnGetCustomFormLayout($mode, FixedKeysArray $columns,
FormLayout $layout)
Parameters
$mode |
The form mode. Possible values are "insert", "inline_insert", "edit", "inline_edit", "multi_edit", "view" and "inline_view". |
$columns |
The associative array of columns displayed in the form. |
$layout |
An instance of the FormLayout class. |
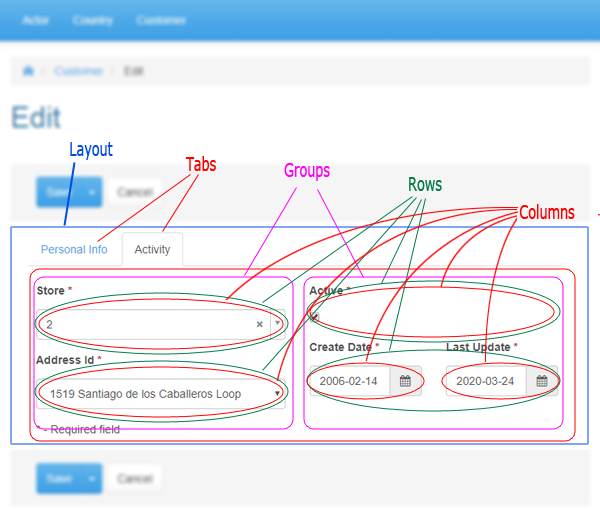
Layout structure
The layout has the following hierarchical structure: layout -> tabs -> groups -> rows -> columns. This means you can add tabs to the layout, groups to tabs and layout, rows to groups, and columns to rows as shown below.
if ($mode=='insert' or $mode=='edit') {
\\ this customization is used for Insert and Edit forms
$layout->setMode(FormLayoutMode::VERTICAL);
\\ labels are placed on the top of the editors
$layout->enableTabs(FormTabsStyle::TABS);
\\ these forms consist of tabs
$personalInfoTab = $layout->addTab('Personal Info');
\\ the first tab is 'Personal Info'
$personalInfoTab->setMode(FormLayoutMode::HORIZONTAL);
\\ this tab's control labels are placed on the left of the editors
$commonInfoGroup = $personalInfoTab->addGroup('Common Information');
\\ there is a 'Common Information' group in this tab
$commonInfoGroup->addRow()
\\ the first row of this group contains two columns:
->addCol($columns['first_name'], 4, 2)
\\ 'first_name' and 'last_name'
->addCol($columns['last_name'], 4, 2);
$commonInfoGroup->addRow()->addCol($columns['email'], 10, 2);
\\ the second row contains 'email'
$activityTab = $layout->addTab('Activity');
\\ the second tab is 'Activity'
$addressGroup = $activityTab->addGroup(null, 6);
\\ 50% (6 of 12) of this tab's space is $addressGroup, a group without caption
$addressGroup->addRow()->addCol($columns['store_id'], 12);
\\ this group contains of two rows: 'store_id'
$addressGroup->addRow()->addCol($columns['address_id'], 12);
\\ and 'address_id' with width 100% (12 of 12)
$activityGroup = $activityTab->addGroup(null, 6);
\\ the next 50% of this tab's space is $activityGroup, a group without caption
$activityGroup->addRow()->addCol($columns['active'], 12);
\\ the first row of this group is 'active'
$activityGroup->addRow()
\\ the second contains two columns:
->addCol($columns['create_date'], 6)
\\ 'create_date' and 'last_update'
->addCol($columns['last_update'], 6);
}
Forms to be customized
By default the form customization will be used in the Edit, Multi Edit, Insert, View, and also on inline inserting and editing. To adjust a concrete form (i.e Edit), use the following condition:
if ($mode=='edit') {
//Your customization code
}
Layout mode (VERTICAL, HORIZONTAL)
By default all forms are horizontal i.e. the control label is placed on the left of the editor (for vertical forms the label is placed on the top of the editor). You can switch the form mode with the setMode method. This method works for layout, a tab, a group and a row.
$layout->setMode(FormLayoutMode::VERTICAL);
\\ the label is placed on the top of the editor
$layout->enableTabs(FormTabsStyle::TABS);
$personalInfoTab = $layout->addTab('Personal Info');
$personalInfoTab->setMode(FormLayoutMode::HORIZONTAL);
\\ the layout consists of tabs and control labels of 'Personal Info'
\\ tab are placed on the left of the editors
Adding a tab
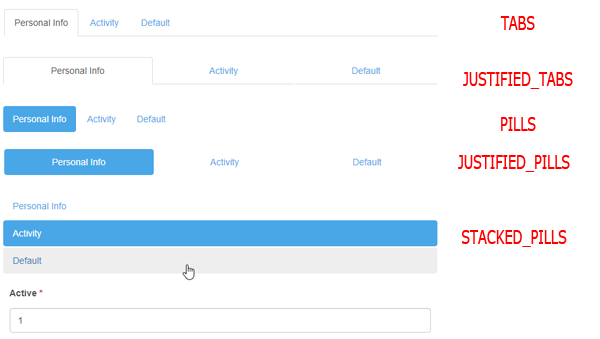
To add a new tab to the layout, first enable tabs on a form with the enableTabs command. The picture below illustrates the tabs appearance in the default color scheme depending of the %TABS_STYLE% value.
$layout->enableTabs(%TABS_STYLE%);
Available values of %TABS_STYLE%:
FormTabsStyle::TABS
FormTabsStyle::JUSTIFIED_TABS
FormTabsStyle::PILLS
FormTabsStyle::JUSTIFIED_PILLS
FormTabsStyle::STACKED_PILLS
To add a new tab use the following command:
$personalInfoTab = $layout->addTab('Personal Info');
Adding a group
To add a new group to the layout, use the addGroup method of the FormLayout class:
public function addGroup($name = null, $width = 12, $customAttributes = '', $inlineStyles = '');
This function returns an instance of the FormLayoutGroup class that can be later used to add rows to the new group (see below). Width is provided in relative units, possible values are integers from 1 to 12.
Example
The following code adds an 'addressGroup' group to the layout. This group has no caption and attributes, takes 50% of the tab's space, and its text color is green.
$addressGroup = $activityTab->addGroup(null, 6, '', 'color: green;');
The following methods can be used for groups:
public function setVisible($value); |
Use it to hide/show groups.
Example: $group->setVisible(false);
|
public function setCustomAttributes($customAttributes); |
Specifies HTML attributes of the group.
Example: $group->setCustomAttributes('data-group="test"');
|
public function setInlineStyles($inlineStyles); |
Use it to set the group style.
Example: $group->setInlineStyles('color: green;');
|
public function setMode($mode); |
Defines where the control label is placed: on the left of the editor (for vertical mode) or on the top of the editor (for horisontal).
Example $addressGroup->setMode(FormLayoutMode::HORIZONTAL); |
Adding rows to a group
To add a new row to a group, use the addRow method of the FormLayoutGroup class (see above):
function addRow();
This function has no parameters and returns an instance of the FormLayoutRow class that can be later used to add controls to the new row (see below).
Adding controls to a row
To add a new control to a row, use the addCol method of the FormLayoutRow class (see above):
function addCol($column, $inputWidth = null, $labelWidth = null);
This function also returns an instance of the FormLayoutRow class to allow method chaining. Here $column is an element of the $columns array and $inputWidth and $labelWidth are relative widths of the editor and its label accordingly ($labelWidth can be used only for horizontal forms).
Examples
All the examples below can be seen live in our Feature Demo.
Example 1
This example shows how to create a simple group with 2 rows and 2 controls in each row (all controls have equal width):
$displayGroup = $layout->addGroup('Display');
$displayGroup->addRow()
->addCol($columns['display_type'], 6)
->addCol($columns['display_size'], 6);
$displayGroup->addRow()
->addCol($columns['display_resolution_x'], 6)
->addCol($columns['display_resolution_y'], 6);
Example 2
This example shows how to create a group and place 3 editors in the same row:
$storageGroup = $layout->addGroup('Storage', 12);
$storageGroup->addRow()
->addCol($columns['storage_min'], 4)
->addCol($columns['storage_max'], 4)
->addCol($columns['storage_external'], 4);
Example 3
This example shows how it is possible to place 2 groups in a row:
$hardwareGroup = $layout->addGroup('Hardware', 6);
$hardwareGroup->addRow()->addCol($columns['chipset'], 12);
$hardwareGroup->addRow()->addCol($columns['cpu'], 12);
$hardwareGroup->addRow()->addCol($columns['gpu'], 12);
$softwareGroup = $layout->addGroup('Software', 6);
$softwareGroup->addRow()->addCol($columns['os_basic'], 12);
$softwareGroup->addRow()->addCol($columns['os_upgradable'], 12);
$softwareGroup->addRow()->addCol($columns['web_browser'], 12);
| Prev | Return to chapter overview | Next |