

 Download
 Buy
BuySQL Maestro for MySQL online help
| Prev | Return to chapter overview | Next |
Create View Wizard
Create View Wizard guides you through the process of creating a new view. See How To Create View to learn how to run this wizard.
The basic principles of Create Object Wizards in SQL Maestro for MySQL are explained in a separate topic. Below you will find a description of wizard steps that are unique for the current object.
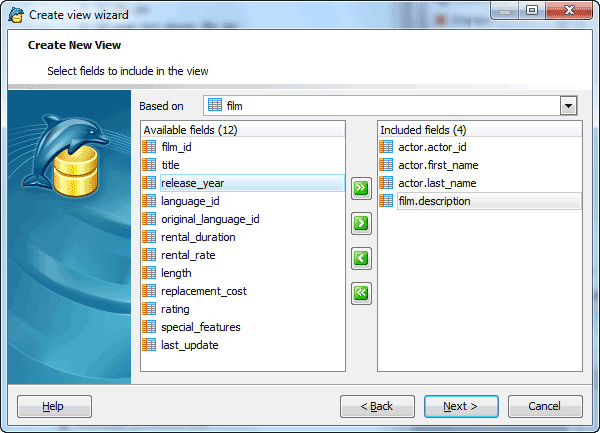
Selecting fields for a new view
Select a table or a view from the Based on drop-down menu. Then specify which fields will be used in the new view. Use Add All or Add Selected buttons to include field(s) into view definition. Use the Remove Selected or Remove All items to exclude field(s) from the view's field list. Click the Next button to proceed.
Specifying view options
Name
You may specify here the name of the view being created.
Owner
Defines the owner of the new view. By default, only the owner of an object can perform various operations with the object. In order to allow other users to operate it, privileges must be granted. (However, users that have the superuser attribute can always access any object.)
Comment
The box allows you to set optional text describing the view.
SQL Security (Definer, Invoker)
These values indicate that the view must be executable by the user who defined it or invoked it, respectively. The default value is Definer. The feature was added in MySQL 5.1.2.
Algorithm (Undefined, Merge, Temporary Table)
The algorithm affects how MySQL processes the view.
Merge |
The text of a statement that refers to the view and the view definition are merged such that parts of the view definition replace corresponding parts of the statement. |
Temporary Table |
The results from the view are retrieved into a temporary table, which then is used to execute the statement. |
Undefined |
MySQL chooses which algorithm to use. It prefers MERGE over TEMPTABLE if possible, because MERGE is usually more efficient and because a view cannot be updatable if a temporary table is used. |
A reason to choose Temporary Table explicitly is that locks can be released on underlying tables after the temporary table has been created and before it is used to finish processing the statement. This might result in quicker lock release than the Merge algorithm so that other clients that use the view are not blocked as long.
 With Check Option
Check the option for an updatable view to prevent inserts or updates to rows except those for which the WHERE clause in the select statement is true.
Check option kind (Cascaded, Local)
The clause is available if With Check Option is 'on'. It allows to determine the scope of check testing when the view is defined in terms of another view. The Local restricts the Check option only to the view being defined. Cascaded causes the checks for underlying views to be evaluated as well. When neither keyword is given, the default is Cascaded.
Specifying the WHERE condition
SQL Maestro for MySQL provides the Filter Builder dialog to facilitate a creating of the WHERE condition.

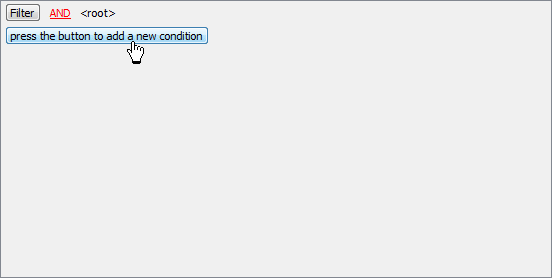
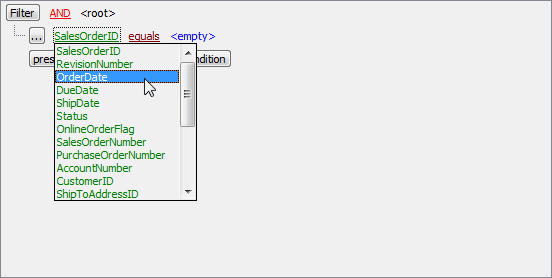
Suppose we need to select orders from the sample table Orders made between 01.02.2010 and 10.02.2010. These criteria are applied to the OrderDate column. Press the button to add this condition. Alternatively, you can use the Filter button and select the Add Condition option from the drop-down menu.
|
Select the OrderDate column in the drop-down list of the available columns.
|
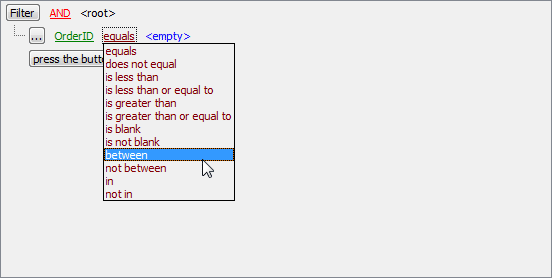
Set the proper operator. In our example it is BETWEEN.
|
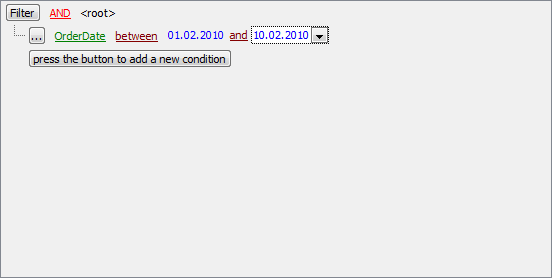
Next, you need to specify the range values for the selected operator. The editor used in value boxes is determined by the editor type assigned to the corresponding column.
Now use the Apply button to see the filter result.
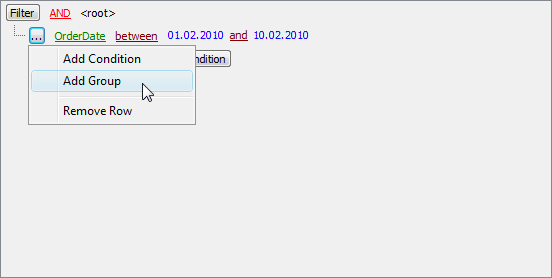
You can add additional conditions to the same root level to be combined by the AND operator. |
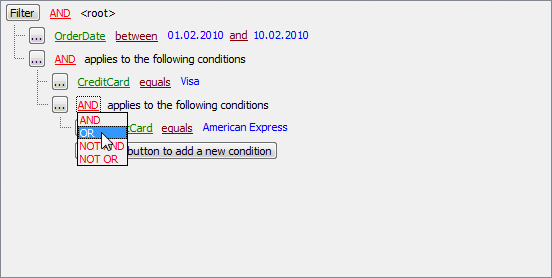
Suppose we need to select orders made between 01.02.2010 and 10.02.2010 and payed via 'Visa' or 'American Express'. This is a complex filter condition combining two simple conditions with the OR operator. Conditions from the same root level are combined by the AND operator. To add a condition combined with the previous one with the OR (NOT AND, NOT OR) operator, use a new group of conditions.
The next screen represents the finished filter conditions for this example. |