

 Download
 Buy
BuyData Wizard for MySQL online help
| Prev | Return to chapter overview | Next |
Setting files to import from
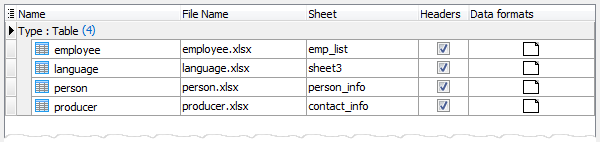
For each selected table specify the input file (table, data source, SQL query) containing the data to be imported in the table and adjust such import options as the Encoding, Data location, Delimiter, etc. for each file separately if necessary (by default, the options specified earlier are applied for all the files).
Import data from several files at a time
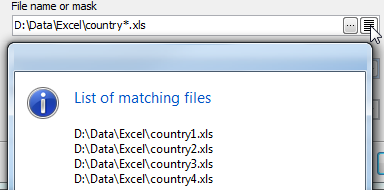
To import data from multiple files with the same structure, set the mask of the file names to the corresponding field. To see the list of matching files, use with the button on the right.
Example: To import data from the following tables:
D:\Data\Excel\country1.xls
D:\Data\Excel\country2.xls
D:\Data\Excel\country3.xls
D:\Data\Excel\country4.xls
use the mask D:\Data\Excel\country*.xls.
Additional import options due to source format
For MS Excel files, specify a data sheet containing the data to be imported to the selected MySQL table. Check the Header box to skip the first row of the file and uncheck it otherwise.
For MS Access files, specify a data table containing the data to be imported to the selected MySQL table. Set the password for the source database if necessary.
For CSV, DSV, and TSV files, select the file encoding, the delimiter, and the quote. Check the Header box to skip the first row of the file and uncheck otherwise.
For TXT and DBF files, select the source file encoding. For text files, check the Header box to skip the first row of the file or uncheck it otherwise.
For .XML files, define the XPath to the data to be imported to the selected MySQL table and select whether data are stored in Attributes or Subnodes.
Example 2: To import data from the following .xml file, use
XPath=/Employees/Employee and
Data location=Subnodes
<?xml version="1.0" encoding="utf-8"?>
<Employees>
<Employee>
<ID>1</ID>
<FirstName>Klaus</FirstName>
<LastName>Salchner</LastName>
<PhoneNumber>410-727-5112</PhoneNumber>
</Employee>
<Employee>
<ID>2</ID>
<FirstName>Peter</FirstName>
<LastName>Pan</LastName>
<PhoneNumber>604-111-1111</PhoneNumber>
</Employee>
</Employees>
Example 3: To import data from the .xml file below, use
XPath=DATAPACKET/Data/Item and
Data location=Attributes
<?xml version="1.0"?>
<DATAPACKET Version="2.0">
<Data>
<Item ID="1" FirstName="Klaus" LastName="Salchner" PhoneNumber="410-727-5112" />
<Item ID="2" FirstName="Peter" LastName="Pan" PhoneNumber="604-111-1111" />
</Data>
</DATAPACKET>
| Prev | Return to chapter overview | Next |