


 Download
 Buy
BuyMaxDB Code Factory online Help
| Prev | Return to chapter overview | Next |
Creating query diagram
The Diagram tab is the main area of Visual Query Builder. Using its graphical interface you can select tables and views, join or select columns, and add conditions to the statement.
The Query Explorer field occupies the left side of Visual Query Builder main window. All the queries included in the result query (unions, subqueries) are represented at the Query Explorer for prompt access. They are grouped by kind and listed under the according node.
Below step-by-step description of query diagram creating.
- Select the statement type from the drop-down list at the top of the Diagram tab (SELECT, INSERT, UPDATE, DELETE).
 Add required tables to the Diagram area.
Use the Add Table(s) link of the area popup menu and select tables from the opened window (Use Ctrl or Shift pressed to select several tables). To add only one table, simply drag it from the Database Explorer or from Object Manager/Browser to the Diagram area.
To remove the object, close its window or select the object and press the Delete key. |
Pick up columns with data to output
To include a table field to the query, tick off the option box to the left of the field name in the list or double-click it to see the blue icon next to the field name.
To include all the table fields, tick off the option box to the left of the table caption. In case none fields is included, the SQL statement is generated as SELECT * FROM <Table_Name>, i.e. all the fields are selected. To remove the fields from the query, uncheck the corresponding boxes. |

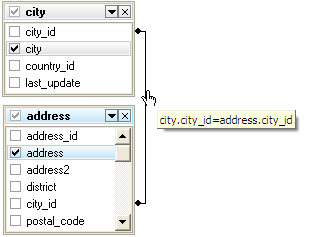
Visual Query Builder supports INNER JOIN, LEFT OUTER JOIN, and RIGHT OUTER JOIN. To associate database objects by two fields, drag a field from the first object's field list to a field from another object's field list. This will set a link between these objects by the selected fields. After you finish dragging, a line will appear between the linked fields. By default INNER JOIN syntax will be used.
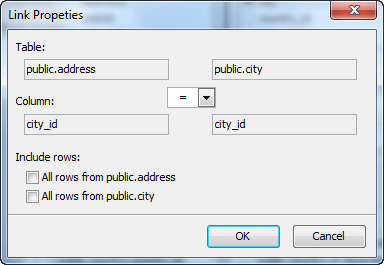
You can view the properties of the object association from the query tab directly. Just set the cursor to the link line. A hint containing the association condition will appear. To edit the properties, select the Properties item from the popup menu. A dialog window will appear, there you can change the association condition by selecting it from the list (=, >, <, >=, <=, <>). To create LEFT OUTER JOIN / RIGHT OUTER JOIN statements, check All rows from first_table/All rows from second_table from the window.
To remove a link between objects, select the Delete Link item from the popup menu.
To delete all the links of an object, click the '-' button next to the object alias. To insert a point to the link line, select the Insert Point item from the popup menu, and the new point will appear. Using the point you can move the link line. It does not cause any changes in the query but makes the diagram performance vivid and the visual building more obvious. |
Criteria tab allows you to set the selection conditions. To add a condition, click the button on the left and select the Add condition item in the popup menu. Edit the condition by clicking its parts and setting their values. Clicking the button to the left of the condition string activates the popup menu which allows you to add a new condition of the same enclosure level, add a new enclosure level, delete the current condition, open or close the condition if it is composite.
A simple condition string contains three fields: an argument, a condition and a second argument (if required for the condition). Clicking each field allows you to set its value. Clicking the argument field make it possible to edit the argument as a text field. You can set a table name or a definite value in this field. The popup menu of the field in the editing mode which contains the Insert Field function (also called by the Shift+Enter hot keys combination).
This function allows you to choose a field from the list of all the table fields available in the query. The popup menu of the condition field allows you to specify the condition you need. The way of proceeding the condition is set in the upper string of the area (All, Any, None, or Not all of the following are possible variants). Click the underlined word to modify it.
|

You can add one or more subqueries to further limit the tables and records returned from a SELECT statement when setting a WHERE condition in the query builder. To add subquery: - open Criteria tab; - click the button on the left and select the Add condition item in the popup menu; - right click on an argument field and use the Insert query link of the popup menu; - build the subquery in the new query tab that have appeared in the Diagram area, or - open Selection tab; - use the Insert query link of the popup menu; - build the subquery in the new query tab that have appeared in the Diagram area. |
You can set/edit the object alias directly from the query tab by double-clicking the object caption.
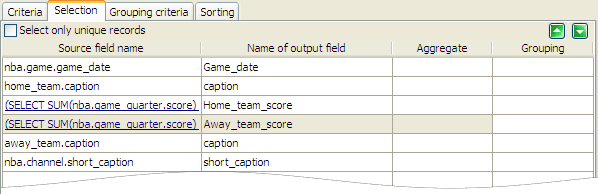
In case the alias is used as the expression's column name use the Selection tab displays the output fields of the query. It allows you to edit the names of the query or CASE output fields, set their displaying order and set the aggregate functions (SUM, MIN, MAX, AVG, etc.) for each field.
To remove the field from the list, select the Delete current row item from the popup menu of the field row. To modify the input query field, double-click it and then type the field name or select one from the drop-down list. To modify the output query field name, double-click it and enter the field name. |
To specify removal of duplicate rows from the result set, open the Selection tab and check the Select only unique records box. |
Set the conditions to be included into the HAVING statement within the Grouping Criteria tab. They are set in the same way as the WHERE conditions. To set the aggregate function for the field, double-click the field row in the Aggregate column and then type the function name or select one from the drop-down list. |
Set the way of sorting the query records within the Sorting tab. The field list on the left represents all the output query fields; the list on the right contains fields by which the query records will be sorted. To move the field from one list to another, drag the selected field or use the Add and Remove buttons. To change the sorting order, select a field in the right list and move it using the Up and Down buttons.
To change the sorting direction, select a filed in the right list and switch the direction (Ascending, Descending) using the A..Z/Z..A button. |
To combine the result from multiple SELECT statements into a single result set, use the Add union link of the Query Explorer popup menu.
Note: The column names from the first SELECT statement are used as the column names for the results returned. Selected columns listed in corresponding positions of each SELECT statement should have the same data type. |