

 Download
 Buy
BuyFirebird Maestro online Help
| Prev | Return to chapter overview | Next |
Restore Database
The backup and restore components of Firebird Server allow you to create a copy of a database. This copy (called database backup) is stored in a location protected from the potential failures of the server running the instance of SQL Server. If the server running the instance of SQL Server fails, or if the database is somehow damaged, the backup copy can be used to recreate, or restore the database. Note, implementing a well-planned backup and restore strategy protects databases against data loss due to damage caused by a variety of failures.
To run Restore Database Wizard, select the Maintenance | Restore Database main menu item.
Selecting database for restore
Supply the server User name. Note that only SYSDBA or the owner of the database (the user who created it) can restore it.
Specify the valid user's Password. If the password is not correct for the user name, you will not be able to restore database.
You can use an exciting database for restore. For this you should select the Use existing database item, then select database from all available database profiles.
To create new database, select the Create new database item and edit Database Profile. If Create new database is specified, you can replace the existing database and register new database profile using the corresponding check-boxes.
Provide the Backup file path and name. Note that the path and the name are on the server side. If you are restoring the database on the originating node (a local database), you can click the ellipsis button on the right of text area and set the file.
Setting additional properties
 Deactivate indexes
If checked, indexes are deactivated. Normally, indexes are rebuilt when a database is restored. If the database contains duplicate values in a unique index when it is being backed up, restoration fails. Duplicate values can be introduced into a database, if indexes have been temporarily made inactive.
Don't recreate shadow files
Shadow files are identical, physical copies of database files in a database. If checked, shadow files are not recreated.
Don't enforce validity conditions
If you redefine validity constraints in a database with data already entered, your data might no longer satisfy the validity constraints. You might not discover this until you try to restore the database, when an error message about invalid data appears. If checked, validity conditions are not enforced while restoring.
Commit after each table
If checked, the metadata and data for each table are restored together, committing one table at a time. This option is useful when you are having trouble restoring a backup file; for example, if the data is corrupt or invalid according to integrity constraints.
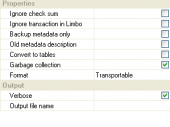
Use all space
Check this field to restore a database with 100% fill ratio on every data page, instead of the default 80% fill ratio.
Verbose
If checked, status messages are not displayed during the restore.
Output file name
This field is available if the verbose option is checked. You can specify an output file to log status messages
during the restore. If verbose is checked and output file is not specified, then this opens a standard text display window to display status messages during the restore.
Generate command line
Follow the link to get a command line for GBAK which will include all the options specified above. The Command Line Builder allows you to copy the generated line to clipboard or save it to a batch file.
Click the Ready button to start the restore process.
| Prev | Return to chapter overview | Next |