

 Download
 Buy
BuyDB2 PHP Generator online Help
| Prev | Return to chapter overview | Next |
OnGetCustomTemplate
This event allows you to customize almost any part of the generated application using an own template instead of the default one.
Signature:
function OnGetCustomTemplate ($part, $mode, &$result, &$params)
Parameters:
$part |
The part of the page to be affected by the template. |
$mode |
The current state of the webpage the template to be used. |
$result |
The path to the file to be used as template according to the components/templates/custom_templates folder. |
$params |
An associative array of additional parameters you want to assign to the template. |
PHP Generator uses Smarty 2.0 as template language. If you are not familiar with web template engines, you might want to start here.
Our Feature Demo provides a number of live examples of customized templates. We would recommend you to study them carefully before trying to customize your application.
To customize a webpage, you need to:
| • | create a new template to be used for this webpage; |
| • | instruct PHP Generator to use this template for the selected webpage. |
The simplest way to create a new template is to modify an existing one (it is much easier than create a new template "from scratch"). Use the table below to select the template corresponding to the necessary state of page and page part. Custom template files must be uploaded to the 'components/templates/custom_templates' directory. This folder should be created by the user of PHP Generator and its content is not changing during the PHP Generator sessions.
To instruct PHP Generator to use a customized template file for a certain webpage, specify the following code in the page's OnGetCustomTemplate event handler (of course you should replace YourPart and YourMode to the appropriate values from the table below).
if ($part == YourPart && $mode == YourMode) {
$result = 'your_template_file.tpl';
}
The following table shows how to customize various pages used in the generated applications.
State of the webpage |
Page Part |
Default template |
Parameters |
webpage layout |
common/layout.tpl |
PagePart::Layout Any PageMode |
|
page list |
page_list_menu.tpl
page_list_sidebar.tpl |
PagePart::PageList Any PageMode
|
|
table grid |
list/grid_table.tpl
list/grid_card.tpl |
PagePart::Grid PageMode::ViewAll
|
|
grid toolbar |
list/grid_toolbar.tpl |
PagePart::GridToolbar |
|
single row |
list/single_row.tpl
list/sinlge_row_card.tpl |
PagePart::GridRow PageMode::ViewAll
|
|
separate page |
view/grid.tpl |
PagePart::RecordCard PageMode::View
|
|
modal dialog |
view/record_card_view.tpl |
PagePart::VerticalGrid PageMode::ModalView |
|
inline form |
view/record_card_inline_view.tpl |
PagePart::VerticalGrid PageMode::InlineView |
|
editors area |
forms/form.tpl |
PagePart::VerticalGrid PageMode::FormEdit
|
|
separate page form |
forms/page_form.tpl |
PagePart::VerticalGrid PageMode::Edit |
|
modal dialog |
forms/modal_form.tpl |
PagePart::VerticalGrid PageMode::ModalEdit |
|
inline form |
forms/inline_form.tpl |
PagePart::VerticalGrid PageMode::InlineEdit |
|
editors area |
forms/form.tpl |
PagePart::VerticalGrid PageMode::FormInsert
|
|
separate page form |
forms/page_form.tpl |
PagePart::VerticalGrid PageMode::Insert |
|
modal dialog |
forms/modal_form.tpl |
PagePart::VerticalGrid PageMode::ModalInsert |
|
inline form |
forms/inline_form.tpl |
PagePart::VerticalGrid PageMode::InlineInsert |
|
webpage layout (list page) |
print/page.tpl |
PagePart::PrintLayout PageMode::PrintAll |
|
data grid (list page) |
print/grid.tpl |
PagePart::Grid PageMode::PrintAll |
|
detail page |
print/detail_page.tpl |
PagePart::PrintLayout PageMode::PrintDetailPage |
|
webpage layout (single record) |
print/page.tpl |
PagePart::PrintLayout PageMode::PrintOneRecord |
|
data grid (single record) |
view/print_grid.tpl |
PagePart::Grid PageMode::PrintOneRecord |
|
Export |
data grid |
export/pdf_grid.tpl, export/excel_grid.tpl, export/csv_grid.tpl, etc |
PagePart::Grid PageMode::ExportPdf, PageMode::ExportExcel, PageMode::ExportCsv, etc |
single record (PDF only) |
export/pdf_record.tpl |
PagePart::RecordCard PageMode::ExportPdf |
|
Record comparison |
data grid |
compare/grid.tpl |
PagePart::Grid PageMode::Compare |
Login page |
login_page.tpl |
PagePart::LoginPage |
|
Login control |
login_control.tpl |
PagePart::LoginControl |
|
Home page |
home_page.tpl |
PagePart::HomePage |
|
Navigation |
navigation.tpl |
PagePart::Navigation |
|
The following table shows how to customize user registration and password recovering pages. These parameters can be used only for the project-level version of this event.
Registration Page |
registration_page.tpl |
PagePart::RegistrationPage |
Registration Form |
registration_form.tpl |
PagePart::RegistrationForm |
Password Recovery Page |
recovering_password_page.tpl |
PagePart::PasswordRecovery |
Reset Password Page |
reset_password_page.tpl |
PagePart::ResetPassword |
Resend Verification Email Page |
resend_verification_page.tpl |
PagePart::ResendVerification |
The following table shows how to customize emails sent to users on registration and password recovering. These parameters can be used only for the project-level version of this event.
Verification email subject |
user_verification_subject.tpl |
PagePart::Mail PageMode::MailVerificationSubject |
Verification email body |
user_verification_body.tpl |
PagePart::Mail PageMode::MailVerificationBody |
Password reset email subject |
recovering_password_subject.tpl |
PagePart::Mail PageMode::MailRecoveringPasswordSubject |
Password reset email body |
recovering_password_body.tpl |
PagePart::Mail PageMode::MailRecoveringPasswordBody |
Example 1:
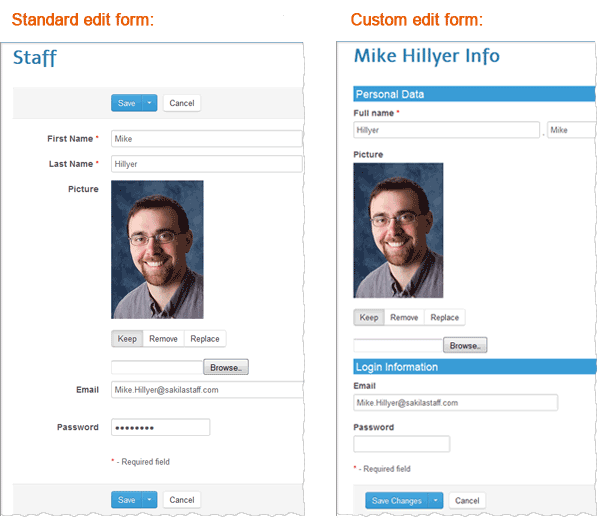
Suppose we need to use components/templates/custom_templates/staff_edit.tpl file as a template for the edit form of a webpage.
if ($part == PagePart::VerticalGrid && $mode == PageMode::Edit) {
$result = 'staff_edit.tpl';
}
Now we can compare the result webpages without using this event and with the enabled one:
Example 2:
A single event handler can be used to customize multiple templates:
if ($part == PagePart::Grid && $mode == PageMode::ViewAll)
$result = 'games_grid.tpl';
if ($part == PagePart::VerticalGrid && $mode == PageMode::Edit)
$result = 'games_edit.tpl';
if ($part == PagePart::RecordCard && $mode == PageMode::View)
$result = 'games_view.tpl';
Example 3
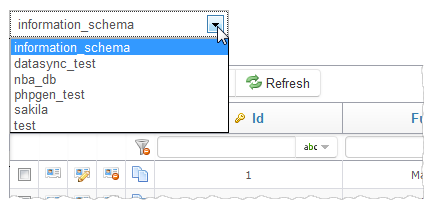
This example shows how to fill a SELECT input with names of all MySQL databases available at the server.
1. Specify the OnGetCustomTemplate event handler as follows:
// set the template file
if ($part == PagePart::Grid && $mode == PageMode::ViewAll) {
$result = 'custom_grid.tpl';
// get the list of available databases
$queryResult = array();
$this->GetConnection()->ExecQueryToArray('SHOW DATABASES', $queryResult);
// fill a one-dimensional array with database names
$databaseNames = array();
foreach($queryResult as $row)
$databaseNames[] = $row[0];
// assign the parameter in the template
$params['databaseNames'] = $databaseNames;
}
2. Add the following code to the template file:
<select name="database">
{foreach from=$databaseNames item=database}
<option value="{$database}">{$database}</option>
{/foreach}
</select>
The screen below demonstrates the result output.
Example 4
This example shows the use of the superglobal $_GET array values in a custom template.
1. Specify the OnGetCustomTemplate event handler as follows:
if ($part == PagePart::Grid && $mode == PageMode::ViewAll) {
$result = 'custom_grid.tpl';
// check if the parameter custom_var available
if (GetApplication()->IsGETValueSet('custom_var'))
// found
$params['custom_var'] = GetApplication()->GetGETValue('custom_var');
else
// not found. Assign a default value.
$params['custom_var'] = '5 (default)';
}
2. Add the following code to the template file:
<div>
<h4>I am a custom template with a custom variable $custom_var. Its value
{if !isset($custom_var)}
still undefined
{else}
= {$custom_var}
{/if}.
</h4>
</div>
Example 4
Let's see the login form customization used in our NBA online demo.
1. Specify the OnGetCustomTemplate event handler as follows:
if ($part == PagePart::LoginPage) {
$result = 'login_page.tpl';
}
2. Add the following code to the template file:
<h2>Logins</h2>
<table class="table table-bordered">
<thead>
<tr>
<th>Username</th>
<th>Password</th>
<th>Description</th>
</tr>
</thead>
<tbody>
<tr>
<td>admin</td>
<td>admin</td>
<td>Can modify any record at any page and manage other users.</td>
</tr>
<tr>
<td>lakers</td>
<td>lakers</td>
<td>Can modify team info, home games and players for LA Lakers.</td>
</tr>
<tr>
<td>boston</td>
<td>boston</td>
<td>The same for the Boston Celtics team.</td>
</tr>
<tr>
<td>game_manager</td>
<td>game</td>
<td>Can access only game list. Can modify any game.</td>
</tr>
</tbody>
</table>
Example 5
The example below is used in our NBA demo application to customize the template used to export a single record to PDF.
if ($part == PagePart::RecordCard && $mode == PageMode::ExportPdf) {
$result = 'game_pdf.tpl';
}
Live example can be found here.
| Prev | Return to chapter overview | Next |