


 Download
 Buy
BuyDB2 Maestro online Help
| Prev | Return to chapter overview | Next |
Fields
Table columns are created and edited within the Field Editor.

To add a new table column, you should either:
or
or
|
Table fields are edited within the Field Editor dialog window. In order to open the dialog you should either
or
You can change the name of the field using the Rename Field dialog. To open the dialog you should either
or
|
To drop the table field:
or
and confirm dropping in the dialog window.
|
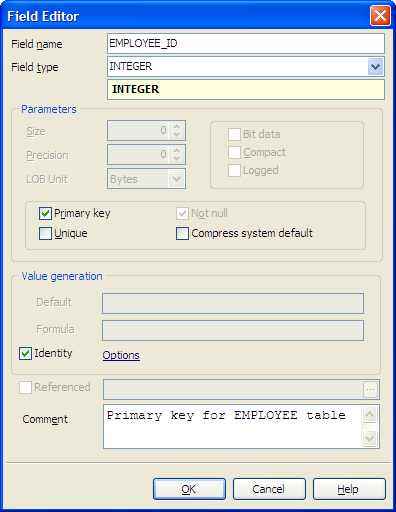
To specify the Data Type, select it from the drop-down list.
Note: the name of the object must be unique among all the object names in the table. You can use any identifier that is allowed by DB2 server.
Parameters
Use the Size edit box to define the length of the field value for integer, float, char and other data types and use Precision to define the precision of the field value, e.g. for float data type.
Precision
The first integer is the precision of the number; that is, the total number of digits; it may range from 1 to 31.
BIT data
Specifies that the contents of the column are to be treated as bit (binary) data. During data exchange with other systems, code
page conversions are not performed. Comparisons are done in binary, irrespective of the database collating sequence.
Compact
Specifies that the values in the LOB column should take up minimal disk space (free any extra disk pages in the last group used by the LOB value), rather than leave any leftover space at the end of the LOB storage area that might facilitate subsequent append operations. Note that storing data in this way may cause a performance penalty in any append (length-increasing) operations on the column.
Logged
Specifies that changes made to the column are to be written to the log. The data in such columns is then recoverable with database utilities (such as RESTORE DATABASE).
LOBs greater than 1 gigabyte cannot be logged and LOBs greater than 10 megabytes should probably not be logged.
Field flags
 Not Null
Forbids the NULL values for the field.
Unique
Includes the field into the unique key (index).
Primary Key
With this option checked the field becomes the only field with a primary key. If you check this field, you will not be able to set this attribute for any other field in the table. Hence if you want to create a compound primary key, do not check this field but create a primary key through the Indexes tab of Table Editor or the appropriate step of Create Table Wizard.
Note: To set a new primary key you need to define a field default value
Formula
Indicates that DB2 will always generate a value for the column when a row is inserted into the table or whenever the result value of the generation-expression may change. The result of the expression is stored in the table. It is the recommended value unless you are using data propagation, or doing unload and reload operations.
Referenced
This provides a shorthand method of defining a foreign key composed of a single column. Thus, if a references-clause is specified in the definition of column C, the effect is the same as if that references-clause were specified as part of a FOREIGN KEY clause in which C is the only identified column.
Default value
Within the box you can assign a default value for the field column. The action is optional. If the default value was specified during the new row created and no values is specified for some of the columns, the columns will be filled with their respective default values.
The Comment box allows you to set optional text describing the field.
Check the Identity option to indicate that the new column is an identity column.
Start value
Specifies the first value for the identity column. This value can be any positive or negative value that could be assigned to this column as long as there are no non-zero digits to the right of the decimal point. The default is 1.
Increment by
Specifies the interval between consecutive values of the identity column. This value can be any positive or negative value that could be assigned to this column. This value cannot be zero and cannot exceed the value of a large integer constant, provided that there are no non-zero digits to the right of the decimal point. If this value is negative, then the sequence of values for this identity column descends. If this value is positive, then the sequence of values for this identity column ascends. The default is 1.
Cache size
Specifies how many values of the identity sequence that DB2 pre-allocates and keeps in memory. Pre-allocating and storing values in the cache reduces logging when values are generated for the identity column. If a new value is needed for the identity column and there are none available in the cache, then the allocation of the value involves waiting for the log. However, when a new value is needed for the identity column and there is an unused value in the cache, the allocation of that identity value can be made quicker by not performing the logging.
You can also use the window to set Minimum value, Maximum value, Cycle, and Order.
Note: A table can only have a single IDENTITY column.