
 Download
 Buy
BuyDB2 Maestro online Help
| Prev | Return to chapter overview | Next |
Create Table Wizard
Create Table Wizard guides you through the process of creating a new database table.
The basic principles of Create Object Wizards in DB2 Maestro are covered by the corresponding topic. See below to find the description of wizard steps that are unique to the current object.
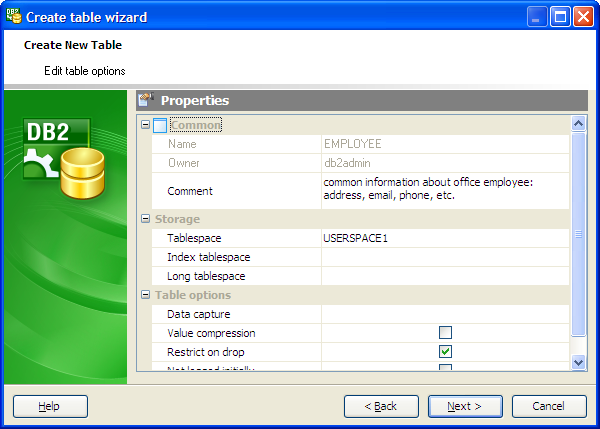
Table options (All fields at this wizard step are optional, i.e. it is not obligatory for you to fill them.)
The field Name contains the name of the table being created as it was set on the previous step.
Owner
You can view here the name of the DB2 server user that will own the new table, or leave this field blank to use the default user (namely, the user executing the command). By default, only the owner of an object can perform various operations with the object. In order to allow other users to operate it, privileges must be granted. (However, users that have the superuser attribute can always access any object.)
Comment
Set the optional text to describe the new table.
This step also allows to set table storage options (tablespaces) and others. For more information use DB2 manuals at
http://www-1.ibm.com/support/docview.wss?rs=71&uid=swg27009552.
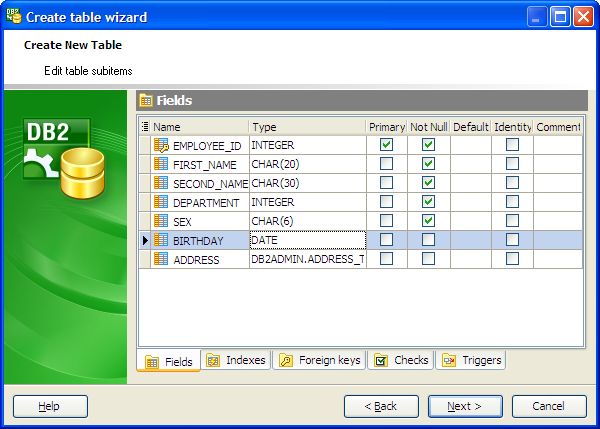
Adding table subitems
On this step of the wizard you can fullfill the new table with fields, indexes, and foreign keys. To add a new object:
| • | Choose the necessary page (Fields - to add table fields, Indexes - table indexes, and so on); |
| • | Follow the corresponding link of the tab's pop-up menu; |
| • | Specify properties of the new object. To find the description of field, foreign key, check, trigger, and index, follow the according link. |
The popup menu of each tab allows to edit, drop, reorder, and rename specified objects, etc.
Click Add All or Add to include table(s) to table definition. Use the Remove or Remove All items to exclude table(s) from the list.
| Prev | Return to chapter overview | Next |