


 Download
 Buy
BuyAnySQL Maestro online help
| Prev | Return to chapter overview | Next |
Setting source file name and format
1. Select the format of the source file.
2. Specify the file you want to import. The file name extension in the File name box varies according to the selected import type. The wizard allows you to import data from several files at a time.
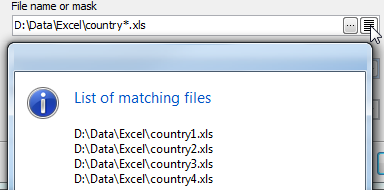
To import data from multiple files with the same structure, set the mask of the file names to the corresponding field. To see the list of matching files, use with the button on the right. Example 1: Suppose, you need to import data from the following tables: D:\Data\Excel\country1.xls D:\Data\Excel\country2.xls D:\Data\Excel\country3.xls D:\Data\Excel\country4.xls The mask for these file names is D:\Data\Excel\country*.xls.
|
3. For ODBC data sources specify the connection string to be used to connect to the data source.
4. Select the data source to import: a table of MS Access database or a spreadsheet of MS Excel.
5. Enter the password to the database (MS Access).
6. For CSV file set the delimiter and quote characters.
7. Select source file Encoding.
8. For .XML files, define the XPath to the data to be imported to the selected table and select whether data is stored in Attributes or in Subnodes.
Example 2: To import data from the following .xml file, use XPath=/Employees/Employee and Data location=Subnodes
<?xml version="1.0" encoding="utf-8"?> <Employees> <Employee> <ID>1</ID> <FirstName>Klaus</FirstName> <LastName>Salchner</LastName> <PhoneNumber>410-727-5112</PhoneNumber> </Employee> <Employee> <ID>2</ID> <FirstName>Peter</FirstName> <LastName>Pan</LastName> <PhoneNumber>604-111-1111</PhoneNumber> </Employee> </Employees>
Example 3: To import data from the .xml file below, use XPath=DATAPACKET/Data/Item and Data location=Attributes
<?xml version="1.0"?> <DATAPACKET Version="2.0"> <Data> <Item ID="1" FirstName="Klaus" LastName="Salchner" PhoneNumber="410-727-5112" /> <Item ID="2" FirstName="Peter" LastName="Pan" PhoneNumber="604-111-1111" /> </Data> </DATAPACKET> |