Choose your database:
AnySQL
MySQL
MS SQL Server
PostgreSQL
SQLite
Firebird
Oracle
SQL Anywhere
DB2
MaxDB

Subscribe to our news:
Partners
Testimonials
Scott McWilliams: "I would just like to thank you for making this fantastic tool available for free. I use it all the time for both my professional and personal projects".
Steve Naidamast: "I just downloaded your new offering of AnySQL Maestro. What a nice product. I was immediately able to connect to an Access database to review the data.

I have already purchased from you your Oracle Maestro as well as your SQLite Maestro.

I am curious as to why you have decided to release such a nice product as Freeware...

Keep up the excellent work".

More

Add your opinion

AnySQL Maestro online help

Prev Return to chapter overview Next

Indexes

Indexes are primarily used to enhance database performance (though inappropriate use may result in slower performance). The key field(s) for the index are specified as column names. Multiple fields can be specified if the index method supports multicolumn indexes.


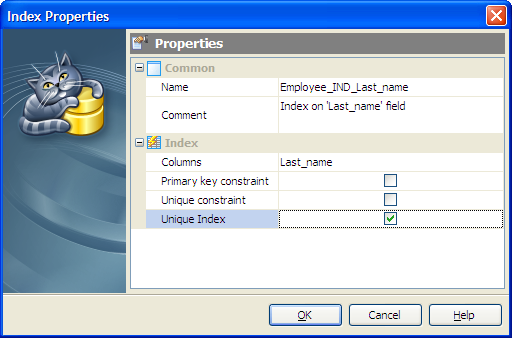
Table indexes are created within the Index Properties dialog window. In order to open the dialog you should either


open the table in Table Editor and the Indexes tab there;
press the Insert key or select the Add New Index... item from the popup menu (alternatively, you may use the corresponding link of the Navigation Bar)

or

select the table in the explorer tree and use the Create New Index popup menu item

or

select the table Indexes node or any index within the table in the explorer tree and use the Add New Index... popup menu item.


Table indexes are edited within the Index Properties dialog window. In order to open the dialog you should either


open the table in Table Editor and the Indexes tab there;
press the Enter key or select the Edit Index item from the popup menu (alternatively, you may use the corresponding link of the Navigation Bar)

or

select the index to edit in the explorer tree and use the Edit Index popup menu item.


You can change the name of the index using the Rename Index dialog. To open the dialog you should either


select the index to rename in the explorer tree;
select the Rename Index item from the popup menu

or

open the table in Table Editor and the Indexes tab there;
select the index to rename;
select the Rename Index item from the popup menu (alternatively, you may use the corresponding link of the Navigation Bar).


To drop the table index:


select the index to drop in the explorer tree;
select the Drop Index item from the popup menu

or

open the table in Table Editor and the Indexes tab there;
press the Delete key or select the Drop Index item from the popup menu (alternatively, you may use the corresponding link of the Navigation Bar)


and confirm dropping in the dialog window.


Use the Columns drop-down list to select a key field(s) for the index.


Primary key constraint

With this option checked this field becomes a compound primary key. It is useful in case the table has more than one primary key.


Unique constraint

Check the option to permit no duplicate values. A unique column must also define the NOT NULL attribute. A table can have one or more unique keys.


Unique Index

If checked, creates a unique index for the table, i.e. the database system ensures that no two rows of the specified table have the same values in the indexed columns. In this way, if two rows both contain the NULL value for all columns of an index, the two index values are not considered to be identical. If at least one column does not contain the NULL value, two rows that have the same value in all non-NULL columns are considered to be identical.


Prev Return to chapter overview Next