


How to change the appearance of a webpage created with PHP Generator. Basic principles.
Last modified: Aug 18, 2012
| Prev | Next |
- change the caption of the selected webpage;
- remove the Save button from the top of the page;
- insert additional blocks;
- specify editor captions to be displayed above the corresponding editors;
- define positions of each column editor;
- change the caption of the Save button.
Note: you can find some additional examples of custom templates in our demo application.
The picture below represents the edit form before and after the customization. There is a screen with default look settings at the left side of the picture. The right one displays the same edit form with changed appearance. The implemented modifications are quite simple, but in real life this feature allows you to completely redesign generated webpages according to your style.
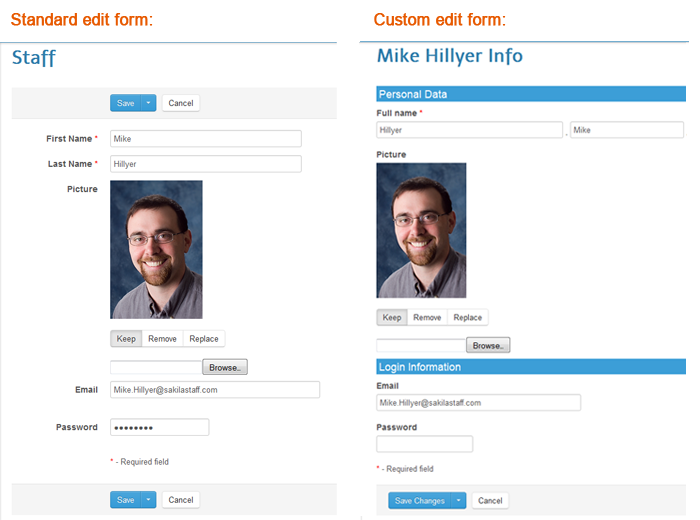 Picture 1. The edit form before and after customization.
- create a new template;
- set PHP Generator to use this template for the selected webpage;
- customize the template according to your needs and preferences.
First step
PHP Generator creates web templates in the components/templates folder of the generated application. Each folder in this category contains template files to be used by the application in different cases:
| edit | defines the appearance of edit forms of the application; |
| export | contains templates to define how data will be represented on export to different formats; |
| insert | defines the appearance of insert forms of the application; |
| stores templates to define how data will be represented on printing; | |
| view | defines the appearance of view forms of the application. |
It assumes that all templates to be used for the appearance customization will be stored under the components/templates/custom_templates folder. This folder is created by the user of PHP Generator, its content is not changing during the further PHP Generator sessions.
The latest version of PHP Generator supports the ability to change the following templates: page.tpl (defines the general view of the corresponding webpage), grid.tpl (specifies how data is represented on the form), and vertical-grid.tpl that specifies how data is represented on the corresponding modal dialog.
Of course you can create the custom template from the scratch, but it's easier to get as a basis the template that is currently used. To use such template, copy it to the custom_templates folder for following modifications. In our example we want to change the appearance of data represented on the edit form. So we need to use the components/templates/edit/grid.tpl file. Let's copy it to the custom_templates folder with another name, e.g. staff_edit.tpl.
Second step
Now we need to specify the generated application to use the new template file for the edit form of the staff table. To do this, open the editor of this table in PHP Generator, specify the OnGetCustomTemplate event handler code and regenerate the application.if ($part == PagePart::VerticalGrid && $mode == PageMode::Edit) { $result = 'staff_edit.tpl'; }
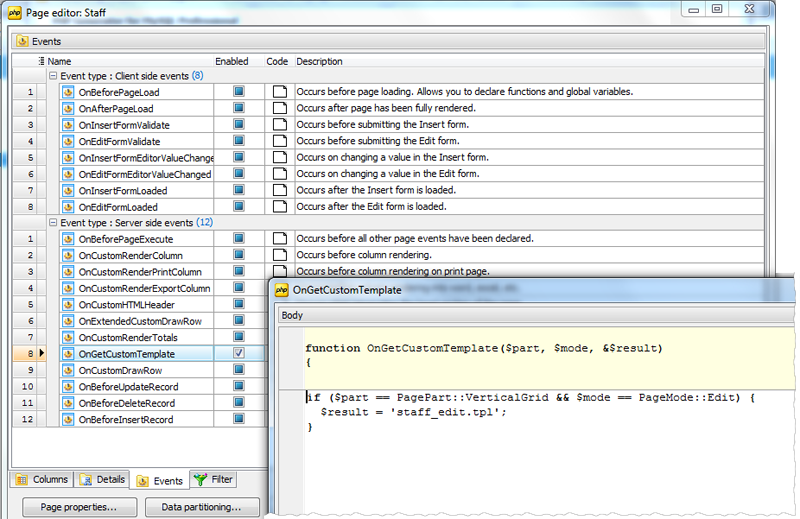 Picture 2. The Events tab of the 'Staff' Page Editor and the OnGetCustomTemplate Event Editor.
Find more about the OnGetCustomTemplate event parameters at the PHP Generator manual.
Third step
Now the grid appearance of the 'staff' edit form completely depends on the 'staff_edit.tpl' file content. The file is a template written on Smarty 2.0. The following variables are used in this template for data output. Place the necessary column name instead of [FieldName] and surround them with braces {} on using in the template.- $Grid.Title - contains the webpage caption. For each page like Edit form, View form, and Copy one returns the caption of the page with data grid as it was set in PHP Generator.
- $Grid.Columns - an array with information about table columns.
- $Grid.Columns.[FieldName].FieldName - contains the name of table column.
- $Grid.Columns.[FieldName].Editor allows to display the column editor as it was set in PHP Generator.
- $Grid.Columns.[FieldName].Caption - contains the column caption as it was set in Page Editor of the table in PHP Generator
- $Grid.Columns.[FieldName].Required is True if the column has been checked as Required in Page Editor of the table in PHP Generator.
- $Grid.Columns.[FieldName].Value contains the column value.
-
To add the name of employee to the page cation, we'll replace the following code:
with the following code:Listing 2.
<div class="page-header form-header">
   <h1>{$Grid.Title}</h1>
</div>
Listing 3.<div class="page-header form-header"> <h1>{$Grid.Columns.first_name.Value} {$Grid.Columns.last_name.Value} Info</h1> </div>
-
To remove the Save button from the top of the page, just remove this block of code:
Listing 4.
<div class="form-actions top-actions">

   <div class="btn-toolbar">

      <div class="btn-group">
         <button class="btn btn-primary submit-button"
            onclick="$(this).closest('form').submit(); return false;"
            >{$Captions->GetMessageString('Save')}
         </button>
         <button class="btn btn-primary dropdown-toggle" data-toggle="dropdown">
            <span class="caret"></span>
         </button>
         <ul class="dropdown-menu">
            <li data-value="save"><a href="#" class="save-button">
            {$Captions->GetMessageString('SaveAndBackToList')}</a></li>
            <li data-value="saveedit"><a href="#" class="saveedit-button">
            {$Captions->GetMessageString('SaveAndEdit')}</a></li>
         </ul>
      </div>

      <div class="btn-group">
         <button class="btn" onclick="window.location.href='{$Grid.CancelUrl}'; return false;">
         Cancel</button>
      </div>

   </div>

</div>
-
To insert additional text block, specify the format of blocks elements first. We used:
and after that add code like thisListing 5.
{literal}
<style>
	.controlgroup-label {
		background-color: #3c9ed7;
		padding: 4px;
		color: #fff;
		font-size: 18px;
		margin-bottom: 10px;
	}
</style>
{/literal}
to the necessary place.Listing 6.<div class="controlgroup-label"> Personal Data </div>
- To specify editor captions to be displayed above the corresponding editors, change the default form class form-horizontal to form-vertical.
-
Now let's put column editors to the places we've planned. The following block specifies the way the column editors are situated on the page. It is the FOREACH loop, where all columns are represented on the page as Caption, Required mark, and Editor sequentially.
We replace it with the following code:Listing 7.
{foreach item=Column from=$Grid.Columns}
    <div class="control-group">
        <label class="control-label">
            {$Column.Caption}
            {if $Column.Required}<span class="required-mark">*</span>{/if}
        </label>
        <div class="controls">
            {$Column.Editor}
        </div>
     </div>
{/foreach}
Listing 8.<div class="controlgroup-label"> Personal Data </div> <div class="control-group"> <label class="control-label" for="not-existed"> Full name {if $Grid.Columns.last_name.Required or $Grid.Columns.first_name.Required} <span class="required-mark">*</span>{/if} </label> <div class="controls"> {$Grid.Columns.last_name.Editor}, {$Grid.Columns.first_name.Editor} </div> </div> <div class="control-group"> <label class="control-label" for="not-existed"> {$Grid.Columns.picture.Caption} </label> <div class="controls"> {$Grid.Columns.picture.Editor} </div> </div> <div class="controlgroup-label"> Login Information </div> {foreach item=Column from=$Grid.Columns} {if $Column.FieldName != 'first_name' and $Column.FieldName != 'last_name' and $Column.FieldName != 'picture'} <div class="control-group"> <label class="control-label" for="not-existed"> {$Column.Caption} {if $Column.Required}<span class="required-mark">*</span>{/if} </label> <div class="controls"> {$Column.Editor} </div> </div> {/if} {/foreach}
- To change the caption of the Save button, replace the {$Captions->GetMessageString('Save')} code fragment to any string you need, e.g. Save Changes.
| Prev | Next |