Choose your database:
AnySQL
MySQL
MS SQL Server
PostgreSQL
SQLite
Firebird
Oracle
SQL Anywhere
DB2
MaxDB

Subscribe to our news:
Partners
Testimonials
Andrey Bistriy: "In our daily business we face the database management and refactoring. We were pleasantly surprised to discover SQL Maestro. After trying it out we started to use it on a regular basis".
Stephen Arrowel, Database Administrator: "We are in the process of implementing Firebird solutions at multiple levels in our international organization. We expect that SQL Maestro Group will do nothing short of revolutionize the way we develop and maintain our Firebird databases. The continuous improvement and development means that the product is extremely flexible and will grow with us. The service and responsiveness of the Support Team has been exceptional. They have devoted countless hours to understanding our needs, so that we could get a Firebird administration tool which would be so simple and effective in use. SQL Maestro Group is helping Sytrax sail into the 21st Century".

More

Add your opinion

Firebird Maestro online Help

Prev Return to chapter overview Next

Fields

Table columns are created and edited within the Field Editor.


To add a new table column, you should either:


open the table in Table Editor and the Fields tab there;
press the Insert key or select the Add New Field... item from the popup menu (alternatively, you may use the corresponding link of the Navigation Bar)

or

select the table in the explorer tree and use the Create New Field popup menu item

or

select the table Fields node or any field within the table in the explorer tree and use the Add New Field... popup menu item.


Table fields are edited within the Field Editor dialog window. In order to open the dialog you should either


open the table in Table Editor and the Fields tab there;
press the Enter key or select the Edit Field item from the popup menu (alternatively, you may use the corresponding link of the Navigation Bar)

or

select the field to edit in the explorer tree and use the Edit Field popup menu item.


You can change the name of the field using the Rename Field dialog. To open the dialog you should either


select the field to rename in the explorer tree;
select the Rename Field item from the popup menu

or

open the table in Table Editor and the Fields tab there;
select the field to rename;
select the Rename Field item from the popup menu (alternatively, you may use the corresponding link of the Navigation Bar).


To drop the table field:


select the field to drop in the explorer tree;
select the Drop Field item from the popup menu

or

open the table in Table Editor and the Fields tab there;
press the Delete key or select the Drop Field item from the popup menu (alternatively, you may use the corresponding link of the Navigation Bar)


and confirm dropping in the dialog window.


To specify the Data Type, select it from the drop-down list.


Note: the name of the object must be unique among all the object names in the table. You can use any identifier that is allowed by Firebird server.
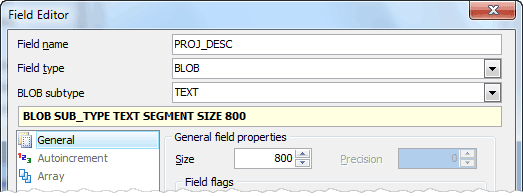
 

Subtype

Specify subtype for BLOB. The subtypes are used to categorize the data type when defining BLOBs. A subtype is a positive or negative numerical value, which indicates the type of BLOB data. The following subtypes are predefined in InterBase/Firebird:

0: Standard blob, non-specified binary data;

1: Text blob, e.g. memo fields;

Text: Alternative for defining subtype 1;

Positive value: Reserved for InterBase;

Negative value: User-defined blob subtypes.


Segment size

A BLOB segment size can be defined to increase the performance when inputting and outputting blob data.


Using the menu to the left from the Field Editor window you can specify different field properties.


Prev Return to chapter overview Next